About Sansa Fuze+
Sansa Fuze+, an update to Sansa Fuze, was announced on August 31, 2010 in capacities of 4GB, 8GB, and 16GB. SanDisk prices this portable media player at $79(4GB), $89(8GB), and $119(16GB). With 2.4-inch color diaplay(QVGA), touch pad, FM radio, FM recording, voice recording, 24 hours of audio playback from a single charge, decent video playback, microSD card slot for expansion, and impressive range of supported formats, Sansa Fuze+ is quite a good choice.
Formats Sansa Fuze supported
- Audio formats: MP3, WMA, Secure WMA, Ogg Vorbis, FLAC, AAC, Audible, Podcasts
- Video formats: MPEG-4, H.264, WMV and Flip Video
- Photo formats: JPEG and BMP; photo formats can be further extended with Sansa Media Converter PC software download, enabling TIFF, GIF, and PNG formats
Although Sansa Fuze+ supports MPEG-4, H.264, WMV and Flip Video, and seems quite powerful somehow, we may still want to enjoy other video formats on it, such as, FLV, MOD, AVI, MKV, etc. Then here comes the question - how to put videos on Sansa Fuze+? Well, it is quite easy only if we have iCoolsoft Sansa Converter. The following is a detailed guide telling you how to put videos on Sansa Fuze+. Follow it and make better use of your Sansa Fuze+!
How to put videos on Sansa Fuze+?
Preparation: Free download Sansa Fuze Video Converter. Follow the steps to install it. Launch the software after installation.
Step 1
Load original file.
Click "Add File" to add video files you want to convert to Sansa Fuze video format from your local disk.
Or you can click "File" button and choose what you need from the list.

Tips: After the files are loaded into the Sansa Fuze Video Converter, you can preview them in the preview pane.
If you like some scene of the file very much and want to save that as your desktop background, you can click the "camera" button to take snapshot of it. The software will store it automatically. You can click "preferences" button to set the default format (JPEG, GIF, or BMP) and default folder. Click Open Containing Folder to open the default folder where the snapped pictures are stored will pop out.
Step 2
Set the output format
Select output format from the drop-down list of Profile in this Sansa Media Converter.
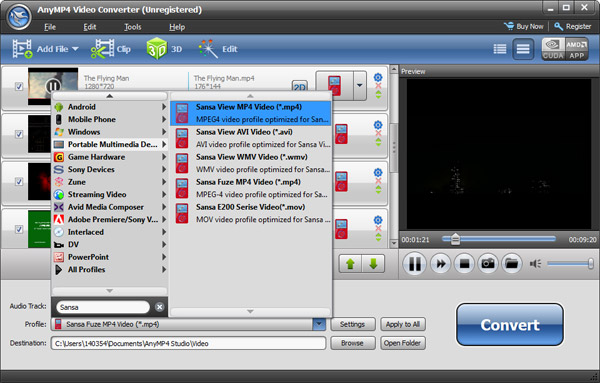
Tips: You can select Audio Track and Subtitle for the target Sansa Fuze video file.
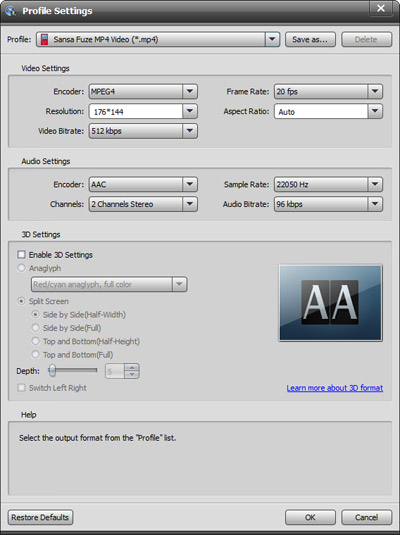
Click and you can set other output parameters in the "Settings" window. For "Resolution", if you cannot find a proper one from the given list, you can input one by yourself.
Step 3
Click "Browse" to specify the destination folder

Click the big "Convert" button to start converting files to Sansa Fuze+ compatible format. Then you just have to wait until the conversion is finished.

Tips:You can edit the original files if you need. The software allows us to adjust Brightness, Contras, and Saturation; trim any time length of clips; crop displaying area; merge several clips into one file; select aspect ratio; add text or picture watermark.
See detailed guide of editing files from here: How to Edit Video Files?