


How to Edit Video Files?
Tips for You to Edit Your Video
First of all, download our iCoolsoft HD Video Converter.
Second,launch and run it.
Third,import you video files you want to edit.
Then,you can edit your video at ease.
> Effect
You can click button "Effect" to adjust Brightness, Contrast and Saturation. You can also check "Deinterlacing" checkbox to avoid mosaic and improve the quality of the video.
.jpg)
> Trim
If you only want to convert a segment of the entire video or do not want to convert some certain segment of the video, you can use the trim function. Click button "Trim" and play the video in the Edit window. You can either drag ![]() and
and ![]() or click
or click  and
and  to set the start time and the end time of the clip you want to trim out. Besides, there is the third way which is to input the exact start time and end time or one of them and the time duration. Button
 ![]() is used to play the clip you have set.
is used to play the clip you have set.
.jpg)
> Crop
To get rid of the black border or to zoom in some part of the scene, you can click button "Crop" and then drag the yellow frame or adjust the values in the boxes. You can also select "Full Screen", "Keep Original", "16:9" or "4:3" from the drop-down list of "Zoom Mode".
.jpg)
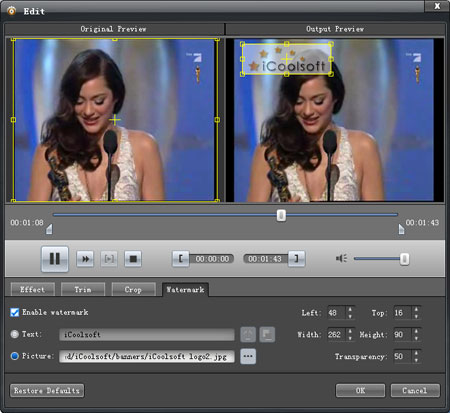
> Watermark
To add text watermark, check "Enable Watermark" and then "Text", input what you want to add in the blank. Button "T" can help you to set the font, size, color, etc. of the text.

To add picture watermark, you have to check "Picture" and click button ![]() to find the picture in your local disc. Dragging or adjusting the values in the boxes can help you to locate the watermark at the place you prefer.
to find the picture in your local disc. Dragging or adjusting the values in the boxes can help you to locate the watermark at the place you prefer.
>Merge
Select the files you want to merge from the file list and then click "Merge". The new file will be automatically named as "Merge" and listed in the file list. You can select it and click "Rename" button to change its name.
.jpg)