


How to Transfer Files for iPad?
Why choose iCoolsoft iPad Transfer?
iCoolsoft iPad Transfer is easy-to-use and time-saving. Most importantly, it can help you transfer video, audio and photo to iPad and backup all iPad files to computer easily. This powerful iPad Transfer even enables you to convert DVD to iPad supported files, and load output files to iPad directly. Other devices like iPod, iTouch and iPhone are also supported.
How to Transfer Files for iPad?
First of all, download iCoolsoft iPad Transfer and install it in your PC.
DOWNLOAD this software to click here![]()
Tip: In using this iCoolsoft iPad Transfer, if you want to use it for your iPad, you do not need to install iTunes, but for iTouch, iPhone or iPad, you need to install iTunes.
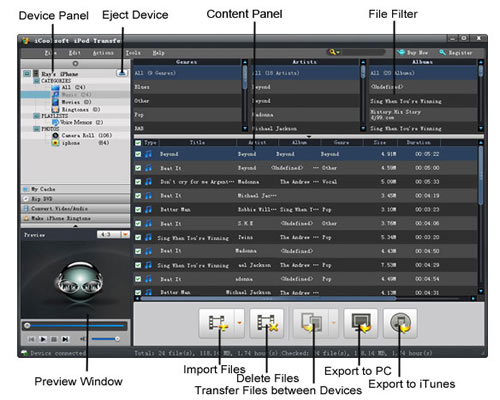
>To import files from PC to iPad:
Step One: Run the software, and connect your iPad/iPhone/iPod/ to your computer via USB cable.
Step Two: Import files to iPad.
1) Music to iPad
Select "Music" in the left list, then the following window will show up.
Tips One: If the files you loaded are compatible with iPad, you can directly click .gif) to import these files and also you can reset the profile and output settings, audio track and subtile.
to import these files and also you can reset the profile and output settings, audio track and subtile.
Tips Two: If the source files you loaded are not compatible with iPad, you need to convert them before import. Choose the output profile and click "Settings" to adjust your video/audio settings, like the Video Encoder, Video Resolution, Video Frame Rate, Video Bitrate, and Audio Encoder, Audio Sample Rate, Audio Channels, Audio Bitrate. Even select the audio track and subtitle. Check "Convert files before importing", then click . After a short while, the conversion can be finished and import the converted files to your devices automatically.
2) Video to iPad:
The way to import video to iPad is the same as importing music to iPad.
3) Image to iPad:
Select "Photo" in the left list, then click to load your local picture to your iPad.
Tips: Right click your selected picture, you can delete them from your iPad directly.
4) Ringtone to iPhone:
Select "Ringtone" in the left list, then click to open the "convert and import" window. Then load your source files.
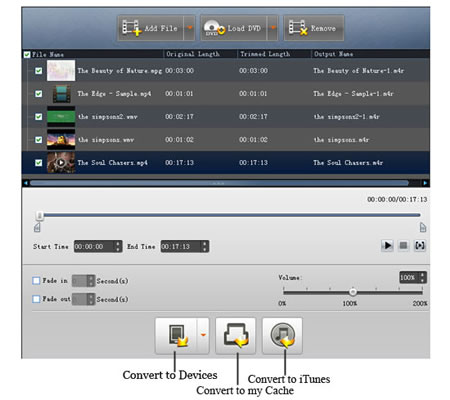
Tips: You can convert any part of DVD/video/audio sources to iPhone ringtone M4R, then import to iPhone directly. Play the source file and drag the button to set the start time and end time of the clip you need. Or you can input the exact start time and end time in the corresponding boxes.
>To export files from your iPad/iPod/iPhone to actual device:
Step One: Run the software, and connect your iPad/iPod/iPhone to your computer via USB cable. After done, the iPad/iPod/iPhone icon and its library and playlists will appear in the Device list.
Step Two: Open the library/playlist that you want to export files, and then check the file(s) you want to export in the file list.
Step Three: Click ![]() to select the destination of the exporting files and start exporting files. Otherwise, you could also choose the Export to local option from the Actions menu, and then export the files from your iPad/iPod/iPhone to actual device.
to select the destination of the exporting files and start exporting files. Otherwise, you could also choose the Export to local option from the Actions menu, and then export the files from your iPad/iPod/iPhone to actual device.
Tip: Click ![]() to use "Track Filter" function to help you quickly browse your library by genre, artist and album.
to use "Track Filter" function to help you quickly browse your library by genre, artist and album.